
[ Cloud Monitoring의 시작 ]
이제 notice-server에 Cloud-Monitoring을 적용시켜보자. (이전에는 stackDriver라고 불렀다!) Cloud-Monitoring은 인스턴스에 대한 모니터링과 로깅 기능을 지원하는 서비스로, 꼭 GCP의 VM Instance뿐만 아니라 AWS의 EC2도 지원하며, 관련 설명도 document를 확인하면 볼 수 있다. 아마 다른 플랫폼에서 지원하는 인스턴스도 한눈에 모니터링 할 수 있도록 지원하는 것이 아닌가 싶다. 부족한 설명들은 아래의 document에 적용단계가 친절하게 나와있으므로 참고하면 될 것 같다.
cloud.google.com/monitoring/quickstart-lamp
Compute Engine 인스턴스 모니터링 빠른 시작 | Cloud Monitoring | Google Cloud
Except as otherwise noted, the content of this page is licensed under the Creative Commons Attribution 4.0 License, and code samples are licensed under the Apache 2.0 License. For details, see the Google Developers Site Policies. Java is a registered trade
cloud.google.com
[ 작성 단계 ]
Cloud Monitoring을 적용하는 단계는 아래와 같다.
- Create a Compute Engine VM instance.
- Install Apache HTTP Server.
- Install the Cloud Monitoring and Logging agents.
- Create an uptime check with an alerting policy.
- Create a custom dashboard and chart.
- View your logs.
- Clean up.
이 중에서 나는 1,2번의 인스턴스 생성단계는 이미 Flask 서버를 만들었으므로 생략하고, Monitoring과 Logging의 Agent를 설치하는 단계로 넘어가도록 하겠다. 설치 전에 monitoring을 지원하는 환경(운영체제, 용량 등) 이 갖춰져 있는 지 꼭 확인하도록 하자.
<Monitoring agent 설치>
3-1. Monitoring agent 패키지 저장소 추가
cloud.google.com/monitoring/agent/installation?hl=ko#agent-install-debian-ubuntu
단일 VM에 Cloud Monitoring 에이전트 설치 | Google Cloud
요점: 이제 한 번에 Compute Engine Linux VM 전체에서 Google Cloud 운영 제품군 에이전트를 모두 설치할 수 있습니다. 하나의 명령어로 새 VM과 기존 VM을 제어하는 정책을 만들어 에이전트를 올바르게 설
cloud.google.com
curl -sSO https://dl.google.com/cloudagents/add-monitoring-agent-repo.sh && \
sudo bash add-monitoring-agent-repo.sh && \
sudo apt-get update
3-2. 에이전트 설치
- 사용가능한 버전 확인
sudo apt-cache madison stackdriver-agent

- 원하는 버전 설치
sudo apt-get install -y 'stackdriver-agent=6.*'
3-3. Agent 동작 확인
sudo service stackdriver-agent status
<Logging agent 설치 ( Monitoring과 동일!! )>
3-4. Logging agent 패키지 저장소 추가
cloud.google.com/logging/docs/agent/installation
단일 VM에 Cloud Logging 에이전트 설치하기 | Google Cloud
요점: 이제 한 번에 Compute Engine Linux VM 전체에서 Google Cloud 운영 제품군 에이전트를 모두 설치할 수 있습니다. 하나의 명령어로 새 VM과 기존 VM을 제어하는 정책을 만들어 에이전트를 올바르게 설
cloud.google.com
curl -sSO https://dl.google.com/cloudagents/add-logging-agent-repo.sh && \
sudo bash add-logging-agent-repo.sh && \
sudo apt-get update

3-5. 에이전트 설치
- 사용가능한 버전 확인
sudo apt-cache madison google-fluentd
- 원하는 버전 설치
sudo apt-get install -y google-fluentd
3-6. Agent 동작 확인
sudo service google-fluentd status
여기까지 설치하고, monitoring에 다시 접속해보면, 인스턴스를 사용한 흔적들이 기록으로 남겨지고 있는 것을 볼 수 있다.

4. 이어서 알람정책을 등록해보도록 하자!!
- GCP > Monitoring에서 Uptime-Checks로 접속한다.

- Create Uptime-Checks > 상황에 맞게 설정해준다.

- 이런식으로 notification을 모바일 앱으로 오게 만들 수 도 있다.

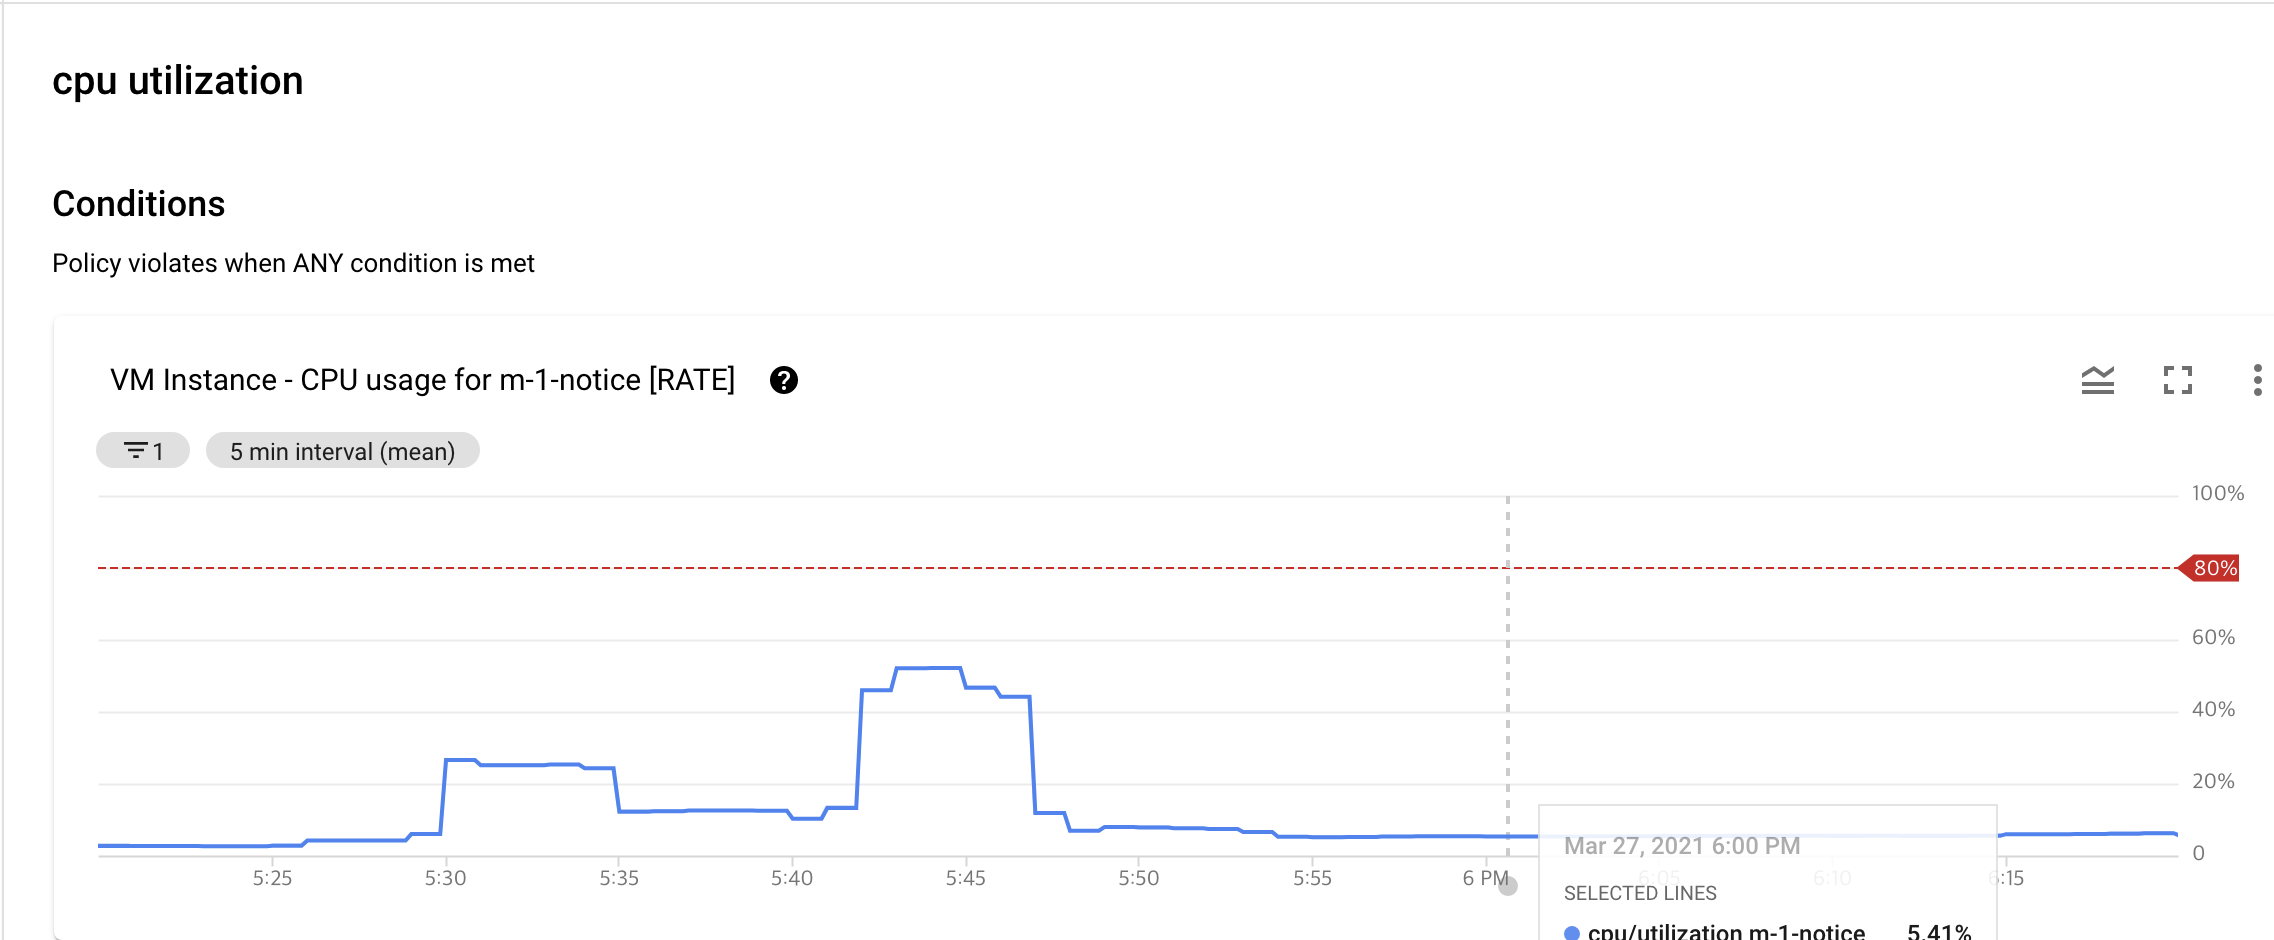
나는 CPU 사용률 80%을 alert 정책으로 설정해 주었다.
5. 대시보드 만들기
Monitorting > DashBoard 에서 필요한 데이터를 이용안 대쉬보드를 제작한다.

More chart options > view logs에 접속하면 다음과 같이 로그 정보 또한 확인할 수 있다.

[ 확인 단계 ]
마지막으로 부하테스트를 통해 모니터링이 잘 동작하는 지를 확인해보도록 하자. 모티터링과 locust를 과도하게(서버를 터르리기 위해) 혹사시켜서 모니터링 해 본 결과 다음과 같이 결과가 잘 나타나는 것을 확인할 수 있었다.


'[Cloud] > [GCP]' 카테고리의 다른 글
| [GCP] Cloud Monitoring 로 VM 인스턴스 로그 수집하기 - 5.NAT을 통한 Static-IP 요금 절약 (0) | 2021.04.09 |
|---|---|
| [GCP] Cloud Monitoring 로 VM 인스턴스 로그 수집하기 - 4. 중간 점검,앞으로 할 일 정리 (0) | 2021.04.08 |
| [GCP] Cloud Monitoring 로 VM 인스턴스 로그 수집하기 - 2. 부하테스트(Locust) (0) | 2021.03.27 |
| [GCP] Cloud Monitoring 로 VM 인스턴스 로그 수집하기 - 1.시작 (0) | 2021.03.24 |
| [GCP] coursera, Cloud Engineering with Google Cloud 과정 수료 (0) | 2020.09.16 |


